
Heat Transfer Vinyl (HTV), also known as iron-on vinyl, is one of the most widely used materials for custom apparel decoration. It allows designers, clothing brands, print shops, and DIY creators to transfer logos, text, graphics, and patterns onto fabrics using controlled heat and pressure.
However, successful HTV application is not simply about heating the vinyl. The final result depends on several factors, including material selection, fabric compatibility, cutting settings, transfer temperature, pressure, peeling method, and washing conditions.
With more than 20 years of experience manufacturing heat transfer materials, YanYan has worked with apparel manufacturers, distributors, and customization businesses worldwide. Based on our production experience and customer feedback, this guide explains how to use different types of heat transfer vinyl correctly and how to avoid common application problems.
What Is Heat Transfer Vinyl?
Heat Transfer Vinyl is a decorative film with a heat-activated adhesive layer. During the transfer process, heat softens the adhesive, while pressure helps the material bond with fabric fibers.
Unlike adhesive vinyl, which is mainly used on hard surfaces such as glass, plastic, or wood, HTV is specially designed for textiles including cotton, polyester, blended fabrics, canvas, and some stretch materials.
How Does Heat Transfer Vinyl Work?
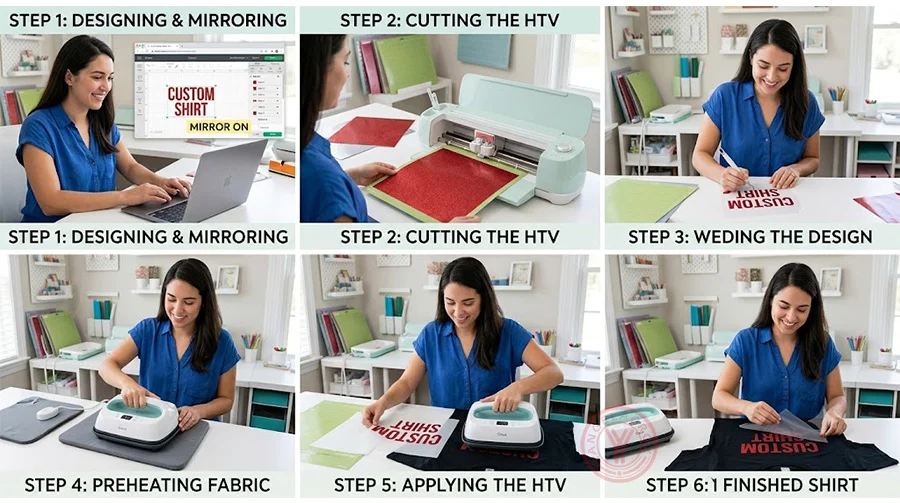
- A cutting machine cuts the design from HTV.
- Unwanted vinyl is removed through the weeding process.
- The design is positioned on the garment.
- Heat and pressure activate the adhesive layer.
- The vinyl permanently bonds with the fabric.
In professional production environments, temperature, time, and pressure are carefully controlled because even small differences can affect adhesion, flexibility, and washing durability.
According to professional heat transfer vinyl suppliers such as Siser, correct heat application parameters are essential for achieving reliable transfer results.
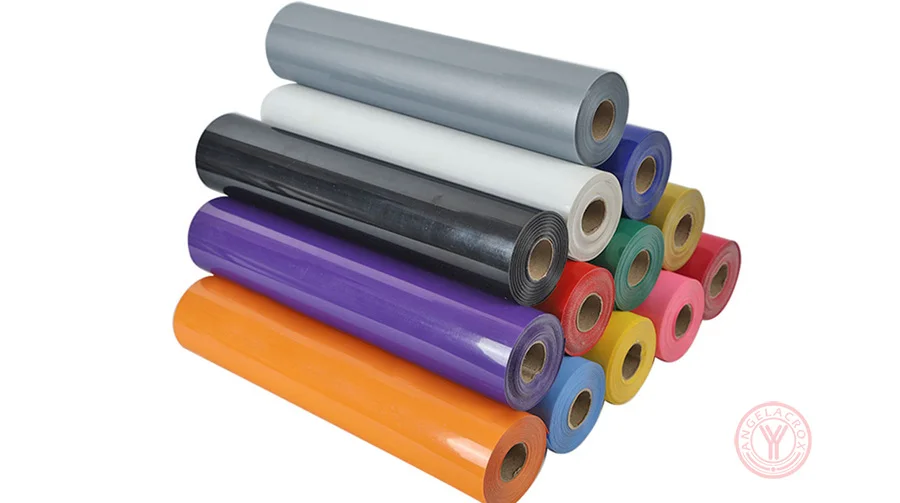
What Can You Make With Heat Transfer Vinyl?
HTV is widely used in both personal projects and commercial apparel production.
- Custom T-shirts and hoodies
- Sports uniforms and team apparel
- Workwear and safety clothing
- Fashion garments
- Baby clothing
- Personalized bags and accessories
- Brand logos and promotional products
What Tools Do You Need to Use Heat Transfer Vinyl?
Before starting an HTV project, prepare the correct tools. Professional equipment provides more consistent results, but small DIY projects can also be completed with basic equipment.
| Tool | Purpose |
|---|---|
| Heat Transfer Vinyl | The material used for fabric decoration |
| Cricut, Silhouette, or other cutting machines | Cuts detailed designs accurately |
| Heat Press Machine | Provides stable temperature and pressure |
| Household Iron | Suitable for small DIY projects |
| Weeding Tools | Remove unnecessary vinyl |
| Teflon Sheet / Heat Transfer Cover | Protects vinyl during pressing |
How to Use Heat Transfer Vinyl Step by Step
The basic HTV application process is similar for most vinyl types. However, specialty materials such as glitter, flock, reflective, and printable HTV require specific settings.
Step 1: Prepare Your Design
Create your artwork using design software and check the final size before cutting.
One of the most common beginner mistakes is forgetting to mirror the design.
Step 2: Load HTV Correctly Into Your Cutting Machine
HTV usually contains two layers:
- Carrier Sheet: Transparent protective layer that holds the design during cutting and pressing.
- Vinyl Layer: Decorative material that transfers onto fabric.
For standard HTV cutting:
- Place the shiny carrier sheet side downward.
- Place the vinyl side upward.
- Mirror the design before cutting.
Step 3: Cut and Weed the Vinyl
After cutting, remove the unwanted vinyl around the design. This process is called weeding.
Different HTV materials have different thicknesses. For example, glitter and flock HTV are thicker than standard PU HTV and may require stronger blade pressure.
Step 4: Prepare the Fabric
Before pressing, prepare the garment properly:
- Remove wrinkles.
- Preheat the fabric for several seconds to remove moisture.
- Place the design in the correct position.
Step 5: Apply Heat and Pressure
Heat transfer success depends on three main factors:
| Factor | Function |
|---|---|
| Temperature | Activates the adhesive layer |
| Time | Allows complete bonding |
| Pressure | Pushes adhesive into fabric fibers |
In our manufacturing experience, many transfer failures are caused by insufficient pressure rather than insufficient temperature. Increasing heat does not always solve adhesion problems.
How to Use Heat Transfer Vinyl on Shirts
Applying HTV to shirts is the most common application. However, selecting the correct vinyl for the fabric is important.
Recommended Fabrics for HTV
| Fabric | Recommended HTV |
|---|---|
| 100% Cotton | PU HTV, Glitter HTV, Flock HTV |
| Polyester | PU HTV, TPU HTV, Reflective HTV |
| Cotton/Polyester Blend | PU HTV, Printable HTV |
| Stretch Sportswear | Elastic PU HTV, TPU HTV |
Shirt Transfer Process
- Place the HTV design on the garment.
- Apply recommended temperature, time, and pressure.
- Remove carrier sheet according to peel instructions.
- Allow the garment to cool before washing.
How to Use Heat Transfer Vinyl on Cricut
Cricut machines are widely used for HTV projects because they provide accurate cutting for detailed designs.
Cricut HTV Workflow
- Select the correct HTV material setting.
- Mirror the design.
- Load vinyl with carrier sheet facing down.
- Cut the design.
- Weed excess vinyl.
- Apply with heat press or iron.
Cricut also provides official guidance for using Iron-On materials with their cutting machines: Cricut Help Center
How to Use Different Types of Heat Transfer Vinyl: Complete Application Settings Guide
Although all Heat Transfer Vinyl products use heat and pressure to bond with fabric, different materials have different structures. A standard PU HTV, glitter HTV, reflective HTV, and flock HTV do not transfer under exactly the same conditions.
During production testing, we evaluate HTV performance based on several factors, including adhesive strength, elasticity, thickness, surface appearance, and washing durability. The following settings are recommended starting points. Always perform a test transfer before bulk production.
Heat Transfer Vinyl Temperature & Time Chart
| HTV Type | Material | Thickness | Temperature | Time | Pressure | Peel Method |
|---|---|---|---|---|---|---|
| PU Heat Transfer Vinyl | Polyurethane (PU) | 0.08-0.15mm |
150-160℃ 302-320℉ |
8-15 seconds |
Medium 3-5 kg |
Warm Peel / Cold Peel |
| TPU Heat Transfer Vinyl | Thermoplastic Polyurethane | 0.15-1.8mm |
152-170℃ 306-338℉ |
8-15 seconds |
Medium 3-5 kg |
Warm Peel / Cold Peel |
| Glitter Heat Transfer Vinyl | PU + Glitter Layer | Around 0.20mm |
140-145℃ 284-293℉ |
10-15 seconds |
Medium 20-30 Pound |
Cold Peel |
| Printable Heat Transfer Vinyl | PU / PVC Printable Film | 0.10-0.18mm |
150-160℃ 302-320℉ |
8-12 seconds | Medium Pressure | Cold Peel |
| Reflective Heat Transfer Vinyl | PU / PES Reflective Material | 0.12-0.15mm |
145-155℃ 293-311℉ |
13-15 seconds |
Medium 3-5 kg |
Cool Peel |
| Flock Heat Transfer Vinyl | Polyester Fiber Surface | 0.45-0.80mm |
150-160℃ 302-320℉ |
10-15 seconds | Medium-High | Cold Peel |
| Puff Heat Transfer Vinyl | PU Foam Structure | 0.5-1.0mm |
150-155℃ 302-311℉ |
12-15 seconds | Medium Pressure | Cold Peel |
| Metallic Heat Transfer Vinyl | PU Metallic Film | 0.10-0.15mm |
145-155℃ 293-311℉ |
10-15 seconds | Medium Pressure | Cold Peel |
| Holographic Heat Transfer Vinyl | PU Holographic Film | 0.15-0.20mm |
150-160℃ 302-320℉ |
10-15 seconds | Medium Pressure | Cold Peel |
| Glow in the Dark HTV | PU Photoluminescent Material | 0.15-0.25mm |
150-160℃ 302-320℉ |
10-15 seconds | Medium Pressure | Cold Peel |
| Patterned Heat Transfer Vinyl | Printed PU / PVC Film | 0.10-0.20mm |
150-160℃ 302-320℉ |
10-15 seconds | Medium Pressure | Warm Peel / Cold Peel |
How to Use PU Heat Transfer Vinyl
PU HTV is one of the most commonly used heat transfer materials because it provides a soft hand feel, excellent flexibility, and good durability.
PU HTV Recommended Settings
- Temperature: 150-160℃ (302-320℉)
- Time: 8-15 seconds
- Pressure: Medium pressure (3-5 kg)
- Peel: Warm peel or cold peel depending on product structure
PU HTV is suitable for:
- Cotton T-shirts
- Polyester apparel
- Sportswear
- Fashion garments
PU HTV is often selected for commercial apparel because its thin structure provides a natural fabric feel. For brands producing large quantities of clothing, flexibility and color consistency are usually more important than simply choosing the thickest material.
How to Use TPU Heat Transfer Vinyl
TPU Heat Transfer Vinyl uses thermoplastic polyurethane as the main material. Compared with standard PU HTV, TPU offers excellent elasticity and is often selected for stretch fabrics and performance apparel.
TPU HTV Recommended Settings
- Temperature: 152-170℃ (306-338℉)
- Time: 8-15 seconds
- Pressure: Medium pressure
- Peel: Warm peel or cold peel
Recommended applications:
- Sports jerseys
- Stretch clothing
- Outdoor apparel
- High-performance fabrics
Because TPU has higher elasticity, it can better follow fabric movement without easily cracking when applied correctly.
How to Use Glitter Heat Transfer Vinyl
Glitter HTV adds a sparkling decorative effect and is widely used for fashion apparel, children's clothing, stage costumes, and personalized products.
Glitter HTV Settings
- Temperature: 140-145℃ (284-293℉)
- Time: 10-15 seconds
- Pressure: Medium pressure
- Peel: Cold peel
Important Glitter HTV Tips
- Use Glitter HTV as a top layer when layering designs.
- Higher cutting pressure may be required because glitter particles increase thickness.
- Avoid excessive heat, which may affect surface appearance.
Many customers increase temperature when glitter vinyl does not stick. However, the real issue is often insufficient pressure or incorrect peeling timing. Proper pressure is usually more important than increasing temperature.
How to Use Printable Heat Transfer Vinyl
Printable Heat Transfer Vinyl is designed for users who want to transfer full-color graphics, photos, gradients, and complex patterns onto garments. Unlike standard HTV, which is cut directly into single-color designs, printable HTV allows the artwork to be printed first and then transferred.
Printable HTV Recommended Settings
- Material: PU or PVC printable transfer film
- Thickness: 0.10-0.18mm
- Temperature: 150-160℃ (302-320℉)
- Time: 8-12 seconds
- Pressure: Medium pressure
- Peel: Cold peel
How to Apply Printable HTV
- Create your design using graphic software.
- Print the image on the printable HTV surface.
- Allow the ink to dry completely.
- Cut around the design if necessary.
- Remove unwanted areas.
- Transfer onto fabric using a heat press.
Printable HTV is commonly used by custom apparel businesses because it allows small quantities of personalized products without expensive setup costs.
For commercial printing customers, the coating quality of printable HTV is critical. Poor ink absorption can cause color fading, uneven printing, or reduced washing performance.
How to Use Inkjet Printable Heat Transfer Vinyl
Inkjet Printable HTV is a beginner-friendly solution because it works with standard inkjet printers available in many homes and small businesses.
Inkjet Printable HTV Process
- Print the image using an inkjet printer.
- Mirror the design if required by the product.
- Cut the printed design.
- Transfer using recommended heat settings.
- Remove the carrier sheet after pressing.
Inkjet Printable HTV Tips
- Use high-resolution artwork for better printing quality.
- Allow enough drying time before transfer.
- Choose the correct product for light or dark fabrics.
- Test washing performance before bulk orders.
How to Use Reflective Heat Transfer Vinyl
Reflective Heat Transfer Vinyl is designed for applications where visibility is important. It is widely used in safety clothing, workwear, outdoor apparel, and sports products.
Reflective HTV Recommended Settings
- Material: PU/PES reflective film
- Thickness: 0.12-0.15mm
- Temperature: 145-155℃ (293-311℉)
- Time: 13-15 seconds
- Pressure: Medium pressure (3-5 kg)
- Peel: Cool peel
Reflective HTV Application Tips
- Avoid overheating because excessive heat may affect reflective performance.
- Use proper pressure to ensure complete adhesive bonding.
- Test durability after washing.
Reflective materials are often selected for workwear because visibility performance is an important safety consideration. Many safety apparel manufacturers evaluate reflective products according to relevant textile and safety requirements.
Reference: OSHA Workplace Safety Resources
How to Use Flock Heat Transfer Vinyl
Flock HTV has a soft velvet-like surface and a thicker structure compared with standard PU vinyl. It creates a premium raised texture and is popular for logos, lettering, and fashion decoration.
Flock HTV Recommended Settings
- Material: Polyester flock fiber with adhesive layer
- Thickness: 0.45-0.80mm
- Temperature: 150-160℃ (302-320℉)
- Time: 10-15 seconds
- Pressure: Medium to high pressure
- Peel: Cold peel
Flock HTV Cutting Tips
- Use stronger blade pressure because of the thicker structure.
- Slow cutting speed may improve detailed designs.
- Avoid very thin lines for complex logos.
Thicker materials are not always better. For garment applications, the best HTV choice depends on the balance between appearance, softness, flexibility, and production requirements.
How to Use Puff Heat Transfer Vinyl
Puff HTV creates a three-dimensional raised effect after heat activation. It is popular in streetwear, fashion brands, and creative apparel designs.
Puff HTV Recommended Settings
- Material: PU foam structure
- Thickness: 0.50-1.00mm
- Temperature: 150-155℃ (302-311℉)
- Time: 12-15 seconds
- Pressure: Medium pressure
- Peel: Cold peel
Important Puff HTV Notes
- Do not over-press because excessive pressure may reduce the puff effect.
- Use simple designs for better 3D appearance.
- Avoid very small details.
How to Use Metallic Heat Transfer Vinyl
Metallic HTV provides a smooth reflective finish and is commonly used for premium fashion, logos, lettering, and decorative designs.
Metallic HTV Settings
- Material: PU metallic film
- Thickness: 0.10-0.15mm
- Temperature: 145-155℃ (293-311℉)
- Time: 10-15 seconds
- Pressure: Medium pressure
- Peel: Cold peel
To maintain the metallic appearance, avoid excessive heat and unnecessary repeated pressing.
How to Use Holographic Heat Transfer Vinyl
Holographic HTV creates a rainbow reflection effect through its special surface structure. It is often used for fashion apparel, accessories, and creative designs.
Holographic HTV Settings
- Material: PU holographic film
- Thickness: 0.15-0.20mm
- Temperature: 150-160℃ (302-320℉)
- Time: 10-15 seconds
- Pressure: Medium pressure
- Peel: Cold peel
Application Tips
- Use sharp cutting blades for detailed patterns.
- Avoid excessive stretching immediately after transfer.
- Select suitable designs for reflective surfaces.
How to Use Glow in the Dark Heat Transfer Vinyl
Glow in the Dark HTV contains photoluminescent materials that absorb light and release a visible glow in dark environments.
Glow HTV Settings
- Material: PU photoluminescent film
- Thickness: 0.15-0.25mm
- Temperature: 150-160℃ (302-320℉)
- Time: 10-15 seconds
- Pressure: Medium pressure
- Peel: Cold peel
Glow HTV Application Tips
- Expose the design to light before testing glow performance.
- Suitable for children's apparel, Halloween products, and creative designs.
- Avoid excessive heat during transfer.
How to Use Patterned Heat Transfer Vinyl
Patterned HTV features printed designs such as camouflage, floral, animal prints, and customized graphics.
Patterned HTV Settings
- Material: Printed PU/PVC film
- Thickness: 0.10-0.20mm
- Temperature: 150-160℃ (302-320℉)
- Time: 10-15 seconds
- Pressure: Medium pressure
- Peel: Warm peel or cold peel
Patterned HTV Tips
- Check design direction before cutting.
- Mirror artwork before cutting.
- Use test samples for large production orders.
Common Heat Transfer Vinyl Problems and Professional Solutions
Even when using high-quality Heat Transfer Vinyl, application problems can still happen if the wrong settings or materials are selected.
Based on our experience working with apparel manufacturers and customization businesses, most HTV problems are related to three areas:
- Incorrect transfer conditions
- Wrong vinyl selection for the fabric
- Improper post-washing care
Understanding the cause is more effective than simply increasing temperature or pressing time.
Why Is My Heat Transfer Vinyl Not Sticking?
This is one of the most common questions from new HTV users.
Possible Causes:
- Incorrect temperature setting
- Insufficient pressing pressure
- Pressing time too short
- Fabric surface contains moisture or finishing chemicals
- Vinyl is not compatible with the fabric
Professional Solution:
Before changing temperature, check pressure first. In our production testing, insufficient pressure is one of the most common reasons for poor adhesion.
A correct HTV transfer requires the adhesive layer to fully contact the fabric fibers. Heat activates the adhesive, but pressure helps create the actual bond.
Why Does Heat Transfer Vinyl Peel After Washing?
Peeling after washing usually indicates incomplete bonding between the adhesive layer and fabric.
Common Reasons:
| Problem | Solution |
|---|---|
| Incorrect temperature | Verify actual heat press temperature |
| Wrong peel method | Follow product-specific instructions |
| Fabric incompatibility | Select suitable HTV type |
| Washing too early | Wait at least 24 hours before first wash |
Why Is My HTV Cracking or Losing Elasticity?
Cracking usually happens when the vinyl structure does not match the fabric movement.
For example:
- Rigid HTV on highly stretchy sportswear
- Incorrect pressing temperature
- Poor-quality adhesive system
- Repeated stretching immediately after transfer
For athletic clothing, leggings, and performance fabrics, flexible PU or TPU HTV is generally recommended because elasticity is an important factor.
How to Choose the Right Heat Transfer Vinyl for Different Applications
| Application | Recommended HTV | Reason |
|---|---|---|
| Basic T-shirts | PU HTV | Soft feel, flexible, easy application |
| Sportswear | TPU HTV / Elastic PU HTV | Higher elasticity and durability |
| Fashion clothing | Metallic / Holographic / Glitter HTV | Premium appearance |
| Safety clothing | Reflective HTV | Visibility performance |
| Premium logos | Flock HTV | Soft velvet texture |
| 3D streetwear designs | Puff HTV | Raised dimensional effect |
| Full-color images | Printable HTV | Supports detailed graphics |
How Manufacturers Test Heat Transfer Vinyl Quality
For professional HTV production, quality evaluation involves more than checking appearance.
At YanYan, HTV performance evaluation focuses on several key areas:
1. Adhesion Testing
Checks whether the vinyl maintains strong bonding after transfer.
2. Washing Durability Testing
Wash testing helps evaluate whether the design maintains adhesion, color, and appearance after repeated laundering.
Many professional HTV products are tested through multiple washing cycles before commercial use. Premium materials can achieve excellent durability when applied correctly.
Textile testing organizations such as AATCC develop standardized methods for evaluating textile performance, including laundering and color-related testing.
3. Elasticity Testing
For sportswear and stretch fabrics, elasticity is critical. A vinyl that looks good on a static garment may fail when repeatedly stretched.
TPU and elastic PU HTV materials are commonly selected for applications requiring flexibility.
4. Material Safety Testing
For garments that contact skin, material safety is an important consideration.
OEKO-TEX STANDARD 100 is one of the recognized textile safety certification systems used to evaluate harmful substances in textile products and components.
Reference: OEKO-TEX STANDARD 100
Professional Heat Press Tips From an HTV Manufacturer
Tip 1: Do Not Solve Every Problem by Increasing Temperature
Many beginners think higher temperature creates stronger adhesion. However, excessive heat may damage fabrics, affect colors, or change the appearance of specialty vinyl.
Tip 2: Always Test the Actual Fabric
The same HTV may perform differently on:
- 100% cotton
- Polyester sportswear
- Coated fabrics
- Stretch materials
For bulk production, testing the actual garment fabric is always recommended.
Tip 3: Record Successful Production Settings
Professional apparel companies usually record:
- HTV model
- Fabric type
- Temperature
- Time
- Pressure
- Peel method
This helps maintain consistent quality for repeat orders.
Heat Transfer Vinyl Washing Instructions
Correct washing habits can extend the service life of HTV designs.
Recommended Care Instructions:
- Wait 24 hours before the first wash.
- Turn garments inside out.
- Use mild detergent.
- Avoid bleach.
- Do not directly iron on the vinyl surface.
- Avoid excessive heat drying.
Professional HTV manufacturers evaluate washing durability because apparel decoration products must maintain appearance throughout the garment lifecycle.
HTV Production Checklist for Businesses
| Stage | Recommendation |
|---|---|
| Material Selection | Choose HTV according to fabric and application |
| Testing | Complete sample transfer before bulk production |
| Production | Maintain consistent heat press settings |
| Inspection | Check adhesion, appearance, and washing performance |
FAQs
What is the best temperature for heat transfer vinyl?
Most standard HTV products transfer between 150-160℃ (302-320℉). However, specialty materials require different settings. Glitter HTV commonly uses around 140-145℃, while TPU HTV may require 152-170℃ depending on thickness and structure.
How long do you press heat transfer vinyl?
Most HTV products require 8-15 seconds under a heat press. The exact time depends on the material type, thickness, adhesive system, and fabric.
Can I use heat transfer vinyl with an iron?
Yes. HTV can be applied with a household iron for small DIY projects. However, a heat press is recommended for commercial production because it provides more accurate temperature and pressure control.
How do you use heat transfer vinyl with Cricut?
To use HTV with Cricut:
- Create your design.
- Mirror the design before cutting.
- Place HTV with carrier sheet facing down.
- Cut and weed the design.
- Apply heat using recommended settings.
Can heat transfer vinyl be layered?
Yes, some HTV materials can be layered. Standard PU HTV is commonly used as a base layer, while specialty materials such as glitter HTV are usually recommended as the top layer.
Can glitter HTV be layered?
Glitter HTV is generally recommended as the top layer because its textured surface can affect adhesion when placed underneath other vinyl layers.
What fabrics work best with heat transfer vinyl?
HTV works well with cotton, polyester, cotton/poly blends, canvas, denim, and selected stretch fabrics. TPU and elastic PU HTV are preferred for highly flexible fabrics.
Why does my HTV peel after washing?
Peeling is usually caused by incorrect temperature, insufficient pressure, wrong peel method, fabric incompatibility, or washing too soon after transfer.
How many washes can heat transfer vinyl last?
High-quality HTV can maintain excellent performance through many washing cycles when applied correctly. Industrial testing and garment conditions can affect final durability.
Can HTV be used on polyester?
Yes. PU HTV, TPU HTV, and reflective HTV are commonly used on polyester garments. Temperature control is important because some polyester fabrics may experience dye migration under excessive heat.
What is the difference between PU HTV and TPU HTV?
PU HTV provides a soft and flexible finish for general apparel. TPU HTV offers higher elasticity and is often selected for sportswear, performance fabrics, and applications requiring repeated stretching.
What cutting machines work with heat transfer vinyl?
Most HTV products are compatible with popular cutting machines including Cricut, Silhouette Cameo, Brother ScanNCut, Graphtec, Roland, and other vinyl cutters.
How do I choose the right HTV for my business?
Choose based on application requirements:
- Fashion brands: Glitter, Metallic, Holographic HTV
- Sportswear: TPU or elastic PU HTV
- Workwear: Reflective HTV
- Custom printing shops: Printable HTV
- Premium logos: Flock HTV
About YanYan Heat Transfer Materials
Why Choose YanYan Heat Transfer Vinyl?
| Customer Challenge | YanYan Solution |
|---|---|
| Unstable quality between batches | Controlled production process and quality inspection |
| Limited customization options | Custom colors, thickness, finishes, and OEM services |
| High MOQ requirements | Flexible order quantities for different customers |
| Long development cycles | Professional technical support and sampling service |
Related Heat Transfer Vinyl
- 3D Puff Heat Transfer Vinyl
- PU Heat Transfer Vinyl (HTV)
- Glitter Heat Transfer Vinyl
- Metallic Heat Transfer Vinyl
- Patterned Heat Transfer Vinyl
- PVC Heat Transfer Vinyl
- Flock Heat Transfer Vinyl (Soft Flock HTV)
- Glow In The Dark Heat Transfer Vinyl
- Reflective Heat Transfer Vinyl
- Light Sensitive HTV
- Chameleon Heat Transfer Vinyl
- Printable Heat Transfer Vinyl
- Thermochromic Heat Transfer Vinyl
- Holographic Heat Transfer Vinyl
- TPU Heat Transfer Vinyl
Professional References
- Cricut Official Iron-On Guide: https://help.cricut.com
- Siser Heat Transfer Vinyl Resources: https://www.siserna.com
- OEKO-TEX STANDARD 100: https://www.oeko-tex.com
- AATCC Textile Testing: https://www.aatcc.org
- ISO Quality Management: ISO 9001
Get Professional Heat Transfer Vinyl Solutions
Whether you are a clothing brand, printing company, wholesaler, or distributor, choosing the right HTV material can directly affect product quality and customer satisfaction.
Contact YanYan for HTV samples, custom solutions, technical support, and bulk supply options.
Request HTV Samples