
If you've ever seen a custom T-shirt with a smooth, slightly raised design — a team name on a jersey, a logo on a tote bag, a name on a baby onesie — there's a good chance it was made with heat transfer vinyl. It's one of the most popular ways to personalize fabric, and it's also one of the easiest crafts to get started with at home or in a small business.
This guide walks through exactly what heat transfer vinyl is, how it works, what it's made of, and how it compares to other decoration methods like sublimation — so you can decide if it's the right tool for your next project.
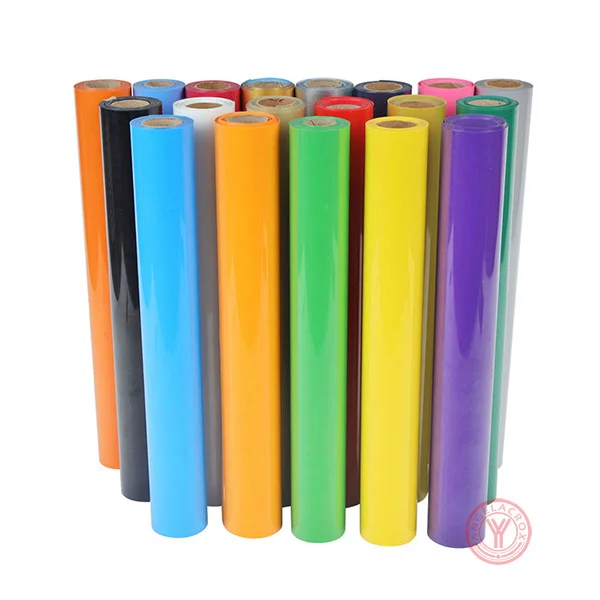
What Is Heat Transfer Vinyl?
Heat Transfer Vinyl (HTV), also called iron-on vinyl, is a thin, flexible film with a heat-activated adhesive on one side. When pressed onto fabric with heat and pressure — using an iron or a heat press — the adhesive melts slightly and permanently bonds the vinyl design to the surface.
Unlike printing methods that lay ink directly onto fabric, HTV works more like a sticker: you cut a design into the vinyl, remove the excess material, and press what's left onto your project. The result is a durable, slightly textured design that can survive dozens of washes when applied correctly.
HTV comes in individual sheets or in rolls, and in dozens of colors and finishes — from basic matte and glossy to glitter, holographic, metallic, flock, and 3D puff.
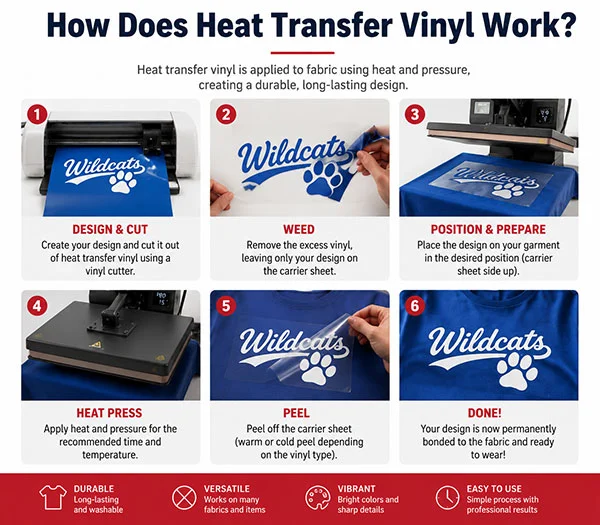
How Does Heat Transfer Vinyl Work?
The process behind HTV is straightforward, and it's the same core workflow whether you're making one T-shirt or a hundred:
- Design — Create or import a design using cutting software (like Cricut Design Space or Silhouette Studio).
- Mirror — Flip the design horizontally, since HTV is cut from the back (shiny) side.
- Cut — A vinyl cutter uses a small blade to trace the design into the vinyl layer without cutting through the carrier sheet underneath.
- Weed — Using a hook or tweezers, you peel away the excess vinyl that isn't part of the design, leaving only the design attached to its carrier sheet.
- Position — Place the vinyl (carrier side up, design side down) onto your fabric.
- Press — Apply heat and firm, even pressure for a set time. This activates the adhesive layer and bonds it to the fabric.
- Peel — Once pressed, remove the carrier sheet — either immediately while hot ("hot peel") or after it cools ("cold peel"), depending on the vinyl type.
Getting the temperature, pressure, and time right is the most important part of the process — settings vary by vinyl brand and fabric type, so it's worth checking the manufacturer's guidelines before your first press.
For more details, please visit 《How Does Heat Transfer Vinyl Work》
What Is Heat Transfer Vinyl Made Of?
HTV is made from one of two base materials, each with different properties:
| PU (Polyurethane) HTV | PVC (Polyvinyl Chloride) HTV | |
|---|---|---|
| Feel | Soft, thin, stretches with fabric | Thicker, more rigid |
| Best for | T-shirts, activewear, jerseys | Bags, aprons, signage, hard-wearing items |
| Stretch/rebound | High — good for stretch fabrics | Low — not ideal for stretch fabrics |
| Durability | Long-lasting with proper care | Very durable, but less flexible |
| Typical thickness | ~20–60 microns | ~60–100 microns |
In general: if the finished item needs to move and stretch with the wearer, go with PU. If durability and rigidity matter more than softness, PVC is the better fit.
A note on TPU: "PU HTV" is actually made from TPU — thermoplastic polyurethane — a 100% polyurethane elastic material applied to the carrier sheet through a coating process. So when a product is labeled "PU vinyl," TPU is the specific polymer doing the work. TPU is what gives this type of HTV its soft, leather-like hand feel, high stretch-and-rebound, and OEKO-TEX-compliant, skin-safe profile — which is why it's the standard choice for children's clothing and fitted apparel. PVC vinyl, by contrast, is a composite of PVC and polyurethane made through a laminating (rather than coating) process, which is what makes it thicker, stiffer, and less breathable than pure TPU-based PU vinyl.
Beyond the base material, HTV also comes in specialty finishes for different visual effects: glitter, holographic, metallic, reflective, flock (a raised, suede-like texture), color-changing, glow-in-the-dark, and 3D puff (which raises off the fabric when heat is applied).
What Is the Carrier Sheet on Heat Transfer Vinyl?
Every sheet or roll of HTV has two distinct sides, and understanding the difference is one of the most important things a beginner can learn:
- The carrier sheet (shiny side): A clear, heat-resistant polyester film. This is the side facing up when you load the vinyl into your cutter, and it's what keeps your design in place — and visible — while you weed and position it. It's peeled away after the design has been pressed onto the fabric.
- The vinyl/adhesive layer (dull, textured side): This is the actual colored material, coated with a heat-activated adhesive. This is the side that ends up touching (and bonding to) your fabric.
A simple way to remember it: you cut into the vinyl through the carrier, and the carrier's only job is to hold the design together and keep it correctly positioned until the heat press does its work — then it comes off and is discarded (or, on some vinyl, saved and reused as a protective cover sheet).
Carrier sheets also come in different "tack" levels — light, medium, or strong stickiness — which affects how easily individual pieces lift off during weeding, especially on intricate designs.
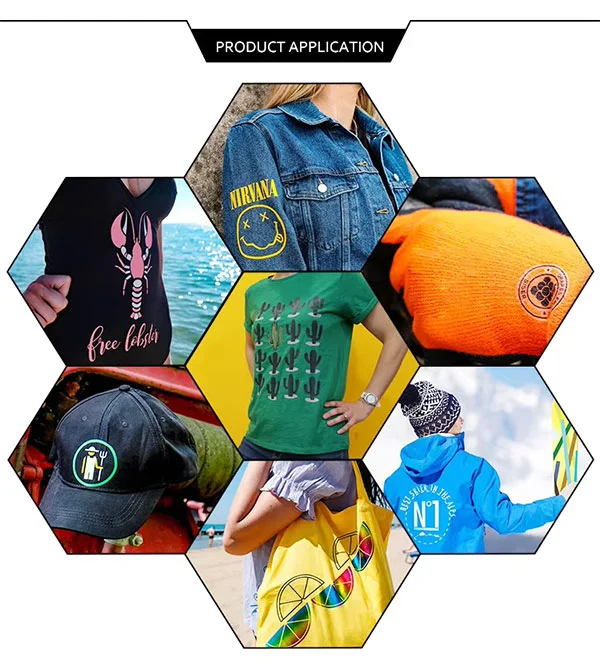
What Is Heat Transfer Vinyl Used For?
HTV's biggest strength is versatility. Common uses include:
- Apparel — T-shirts, hoodies, sports jerseys, hats, and activewear
- Bags and accessories — Totes, backpacks, aprons
- Home textiles — Pillows, towels, blankets
- Promotional and business items — Uniforms, branded merchandise, event giveaways
- Non-fabric surfaces — Wood, glass, acrylic, and leather, provided the material can safely tolerate heat and pressure (roughly 250–320°F / 120–160°C, depending on the vinyl and fabric)
Because it works on cotton, polyester, cotton-poly blends, canvas, and even dark-colored fabrics, HTV is often the go-to method for small-batch or one-off custom designs where a full printing setup wouldn't be cost-effective.
What Are the Different Types of Heat Transfer Vinyl?
| Type | Look & Feel | Best Used For |
|---|---|---|
| Standard (matte/glossy) HTV | Smooth, thin, flexible | Everyday T-shirts, logos, text |
| Glitter HTV | Sparkly, slightly textured | Fashion designs, kidswear, dance costumes |
| Metallic HTV | Shiny, foil-like sheen | Statement designs, accents |
| Holographic HTV | Rainbow, iridescent shimmer | Eye-catching logos, novelty designs |
| Flock HTV | Raised, velvety, suede-like texture | Retro-style designs, an embroidery alternative |
| 3D Puff HTV | Rises off the fabric when heat-pressed | Bold logos, varsity-style lettering |
| Reflective HTV | Shows up under direct light/flash | Safety gear, activewear, athletic wear |
| Glow-in-the-dark HTV | Glows after light exposure | Novelty and kids' designs |
| Printable HTV | Blank vinyl printed with a solvent printer before cutting | Full-color, photographic-style designs |
Standard cut vinyl is limited to one color per layer — multi-color designs require layering separate pieces of vinyl on top of each other, which adds time but allows for detailed, professional-looking results.
What Is the Difference Between Heat Transfer Vinyl and Sublimation?
This is one of the most common questions for anyone starting out in garment decoration, because the two methods solve different problems.
| Heat Transfer Vinyl (HTV) | Sublimation | |
|---|---|---|
| How it works | Vinyl film is cut, weeded, and heat-pressed onto the surface | Dye is printed on paper, then heat converts it to gas and infuses it into the fabric |
| Feel | Slightly raised, noticeable texture | No texture — the design becomes part of the fabric |
| Fabric compatibility | Cotton, polyester, blends, canvas, leather — works on dark colors too | Requires light-colored, polyester-based (or poly-coated) materials only |
| Color/design complexity | Best for simple designs, text, and logos (multi-color needs layering) | Excellent for full-color, photo-realistic designs in one pass |
| Startup cost | Low — vinyl cutter, heat press or iron, vinyl sheets | Higher — dedicated sublimation printer, ink, paper, coated blanks |
| Durability | Long-lasting with proper care, but can peel/crack over time | Extremely durable — won't crack, peel, or fade from the surface |
| Best for | Small batches, dark or cotton fabrics, specialty finishes (glitter, puff, etc.) | Bulk runs, light polyester items, photo-quality graphics |
In short: choose HTV if you're working with cotton, dark-colored fabric, or want specialty textures like glitter or puff. Choose sublimation if you're printing full-color, photo-realistic designs on light-colored polyester items and want a completely flat, permanent finish.
How to Use Heat Transfer Vinyl?
Here's a simple step-by-step for your first project:
What you'll need:
- A vinyl cutter (Cricut, Silhouette, or similar)
- Heat transfer vinyl sheets or rolls
- A heat press or household iron
- Weeding tools (a hook or fine-point tweezers)
- Design software and a cut file
Steps:
- Prepare your design in your cutting software, and mirror it horizontally.
- Load the vinyl shiny (carrier) side down onto your cutting mat.
- Set your cutter to the correct blade depth and pressure for your specific HTV — always do a small test cut first.
- Cut the design, then remove it from the mat.
- Weed the vinyl — carefully peel away everything that isn't part of your design, leaving the finished design attached to the carrier sheet.
- Preheat your fabric for a few seconds to remove moisture and wrinkles.
- Position the vinyl, carrier-side up, on the fabric exactly where you want the design.
- Press using the time, temperature, and pressure recommended for your specific vinyl (this varies by brand and material — see the parameter table below, and always double-check the packaging).
- Peel the carrier sheet — hot or cold, depending on the vinyl type.
- Press again for a few seconds without the carrier sheet (recommended for many vinyl types) to fully set the adhesive.
Temperature, Pressure & Time Chart
Exact settings vary slightly by brand, but these are the industry-standard ranges to start from:
| Vinyl Type | Temperature | Pressure | First Press Time | Peel Type |
|---|---|---|---|---|
| Standard PU (TPU-based) | 305–320°F (150–160°C) | Medium pressure (3–5kg) | 10–15 sec | Warm/cold peel |
| Standard PVC | 300–320°F (150–160°C) | Medium pressure (3–5kg) | 10–15 sec | Cool peel |
| Glitter | 320–350°F (160–177°C) | Medium pressure | 10–15 sec | Cold peel |
| Metallic / Holographic | 320–340°F (160–171°C) | Medium pressure | 10–15 sec | Cold peel |
| Flock | 305–320°F (150–160°C) | Medium pressure | 15 sec | Cold peel |
| 3D Puff | 315–325°F (157–163°C) | Medium pressure | 10–15 sec | Hot peel |
| Reflective | 320–340°F (160–171°C) | Medium pressure | 10–15 sec | Cold peel |
| Foil / Stretch | 270–300°F (132–149°C) | Light–medium | 10–15 sec | Cold peel |
Adjusting for fabric type:
- Cotton and cotton blends generally tolerate the higher end of the temperature range and firmer pressure.
- Polyester and synthetic blends scorch more easily — stay toward the lower end (around 270°F/132°C) with lighter pressure to avoid a shiny or melted look.
- Stretch fabrics (spandex, lycra, performance wear) usually need a slightly higher temperature (around 320–335°F/160–168°C) for around 10 seconds so the vinyl bonds fully without restricting stretch.
Final press (recommended for most vinyl types): after peeling the carrier sheet, cover the design with a Teflon sheet or parchment paper and press again for 5–10 seconds at the same temperature. This "second press" helps fully cure the adhesive and improves wash durability.
Always run a test press on a fabric scrap first — settings can vary between brands, and even between colors within the same product line.
A few tips to avoid common mistakes:
- Don't skip the test cut — cut settings vary between vinyl brands and even between colors of the same brand.
- Use a Teflon sheet or parchment paper between your press and the design to protect both surfaces.
- Let the garment cool completely before folding or wearing it.
- Turn the garment inside out and wash on a gentle, cool cycle to extend the life of the design.
Frequently Asked Questions
Can I use a regular iron instead of a heat press? Yes, for simple projects. However, an iron struggles to provide the consistent heat and even pressure a heat press delivers, which can lead to peeling or uneven adhesion — especially with specialty vinyl like glitter or puff.
How long does HTV last on clothing? With correct application and gentle washing (cool water, inside-out, low heat drying), quality HTV can last 50 washes or more.
Can heat transfer vinyl be used on dark fabric? Yes — this is one of HTV's advantages over sublimation. Standard and white HTV both show up clearly on dark backgrounds.
Is heat transfer vinyl the same as iron-on vinyl? Yes, "iron-on vinyl" is simply another common name for heat transfer vinyl.
Can HTV be applied to non-fabric items like wood or glass? Yes, as long as the surface can withstand the required heat and pressure — always check the vinyl manufacturer's guidance for non-fabric substrates.
Ready to Try It Yourself?
Now that you know how heat transfer vinyl works, the best way to get comfortable with it is to make something. Browse our full range of PU, PVC, and specialty HTV — or grab a beginner-friendly starter bundle with everything you need for your first project — and start turning your designs into wearable, giftable, sellable creations today.