
Layering heat transfer vinyl (HTV) allows you to create multi-color designs, logos, names, numbers and specialty effects on T-shirts, hoodies, sportswear, bags and other textile products. However, successful HTV layering is not simply a matter of stacking one vinyl on top of another.
The key factors are material compatibility, layer order, alignment, pressing time and cumulative heat exposure. Using the wrong HTV as a base layer or fully pressing every color can lead to peeling, shrinkage, distortion and excessive thickness.
In this guide, you will learn how to layer heat transfer vinyl correctly, which HTV types can be layered, how to handle glitter and other specialty HTV, when to use a knockout design, and how to troubleshoot common layering problems.
Quick Answer: How Do You Layer Heat Transfer Vinyl?
To layer heat transfer vinyl correctly:
- Separate the artwork into individual color layers.
- Check that the selected HTV materials are compatible with layering.
- Mirror each HTV layer before cutting.
- Cut and weed each color separately.
- Pre-press the garment when recommended.
- Apply the bottom layer first.
- Use a short tack press rather than a full application cycle for intermediate layers.
- Align and tack the next layer.
- Repeat until all layers are positioned.
- Complete the final press according to the HTV manufacturer's application instructions.
- Allow the finished design to cool and follow the recommended washing instructions.
The most important rule is simple: not all HTV products are designed to be layered. Smooth standard HTV is generally easier to layer than textured or dimensional materials such as glitter, flock or puff HTV. Always check the application instructions for the specific HTV product you are using.
What Does Layering HTV Mean?
Layering HTV means combining two or more pieces of heat transfer vinyl to create a single multi-color or multi-effect design.
For example, a T-shirt design may contain:
- A white base shape
- Blue lettering
- A red accent
- A glitter highlight
Each color is cut separately and then transferred onto the garment in a planned sequence.
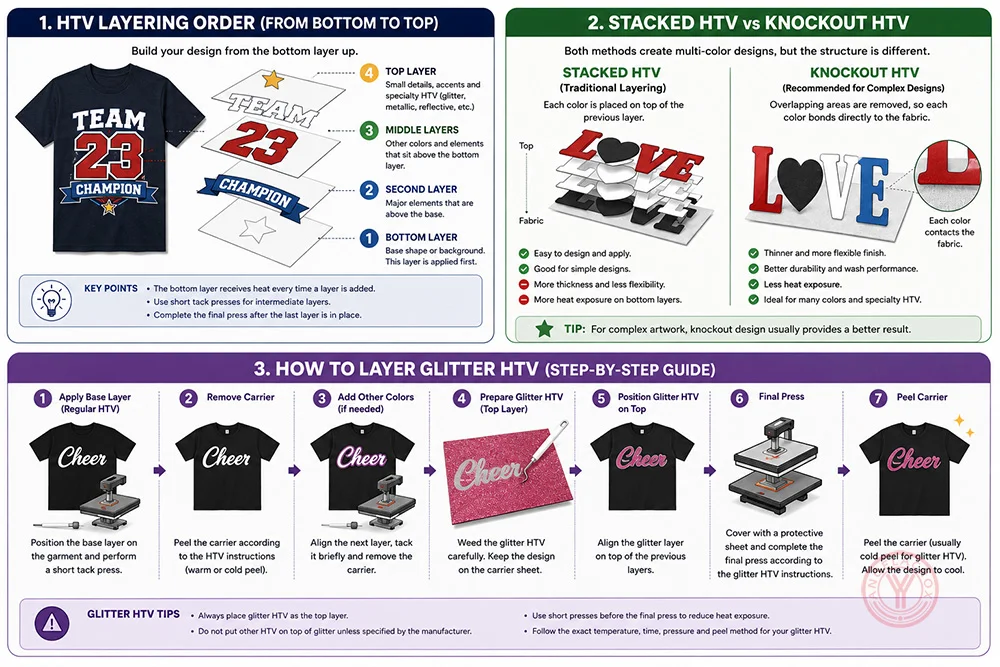
The lower part of the design is normally applied first, while the elements that visually sit above it are applied later.
However, not every multi-color design needs to be physically stacked. For complex artwork, a knockout design can be a better solution. Instead of placing one HTV layer directly over another, overlapping areas are removed so that each color bonds directly to the fabric.
Can You Layer Heat Transfer Vinyl?
Yes, many heat transfer vinyl products can be layered, but compatibility depends on the specific materials.
Standard smooth PU HTV is generally one of the easiest materials to use for multi-color layering because the surface is relatively smooth and provides a predictable bonding area.
Specialty HTV requires more attention. Glitter, holographic, flock, metallic, reflective and puff materials can have different surface structures and application requirements.
Before production, check:
- Whether the HTV is approved for layering
- Whether it can be used as a bottom layer
- Whether another HTV can be applied over it
- Recommended temperature
- Recommended pressure
- Recommended application time
- Peel method
- Fabric compatibility
Do not assume that two HTV products are compatible simply because both are described as heat transfer vinyl.
HTV Layering Compatibility Guide
| HTV Type | Base Layer | Top Layer | Layering Recommendation |
|---|---|---|---|
| Standard PU HTV | Usually suitable | Suitable | One of the easiest options for multi-color designs |
| Stretch HTV | Usually suitable | Suitable | Use compatible stretch materials for flexible garments |
| Glitter HTV | Generally not preferred | Suitable | Usually best used as a final decorative layer |
| Holographic HTV | Product dependent | Usually suitable | Commonly used as a top layer |
| Metallic HTV | Product dependent | Usually suitable | Check the manufacturer's layering instructions |
| Reflective HTV | Product dependent | Usually suitable | Test the actual material combination before production |
| Flock HTV | Product dependent | Suitable | Textured surface requires compatibility testing |
| Puff HTV | Generally not preferred | Suitable | Dimensional expansion requires careful layer planning |
| Glow-in-the-Dark HTV | Product dependent | Usually suitable | Check the surface construction and application instructions |
| Patterned HTV | Product dependent | Suitable | Usually used as a visible decorative layer |
This table provides general guidance. The technical instructions for the specific HTV product should always take priority.
What Goes First When Layering HTV?
In most layered designs, start with the element that visually sits at the bottom or behind the other elements.
For example:
- White background
- Blue lettering
- Red details
- Silver glitter highlights
The white background would normally be applied first, followed by blue, red and then silver glitter.
However, visual order is not the only consideration. The material used for the first layer must also be suitable for receiving additional HTV.
If the bottom material has a textured or specialty surface that is not designed for layering, change the artwork rather than forcing another HTV layer onto it.
Why You Should Not Fully Press Every HTV Layer
One of the most common mistakes when layering heat transfer vinyl is applying the complete recommended pressing cycle to every color.
Imagine a four-color design. If every color receives a full press, the first layer may be exposed to heat four times before the design is finished.
Repeated heating can increase the risk of:
- Vinyl shrinkage
- Design distortion
- Registration problems
- Carrier marks
- Fabric scorching
- Excessive adhesive activation
- Changes in surface appearance
For this reason, intermediate layers are commonly tacked briefly rather than fully pressed. The final application completes the required bonding process.
There is no universal tack time for every HTV. The correct time depends on the material construction, adhesive, heat press and substrate. Follow the manufacturer's application instructions for the specific product.
Tools You Need for Layering HTV
A basic layered HTV project does not require complicated equipment.
- Vinyl cutter
- Heat press
- Weeding tool
- Heat-resistant tape
- Alignment ruler or guide
- Protective cover sheet when required
- Suitable pressing pad
A household iron can be used for some small projects, but a heat press provides much better control over temperature, pressure and pressing time.
For commercial production, repeatability is particularly important. The goal is not simply to produce one successful shirt, but to reproduce the same result across an entire order.
Step-by-Step: How to Layer Heat Transfer Vinyl
Step 1: Separate the Artwork by Color
Start by dividing the design into separate color layers.
For a four-color design, you might have:
- Layer 1 – White
- Layer 2 – Black
- Layer 3 – Red
- Layer 4 – Glitter
Decide which element should be at the bottom and which should be visible on top.
At this stage, also determine whether the design should be stacked or converted into a knockout layout.
Step 2: Add Alignment References
Multi-color designs need accurate registration.
You can use registration marks, alignment shapes, equal-size weeding boxes or garment centerlines to help position each layer.
For complex artwork, temporarily assemble the weeded layers on their carrier sheets before pressing anything. This makes it much easier to identify alignment problems before the garment is exposed to heat.
Step 3: Mirror Each HTV Layer
Mirror the artwork before cutting HTV.
This is essential because HTV is transferred from the carrier sheet onto the garment.
For multi-color designs, check every layer individually. A single unmirrored color can ruin the entire design.
Step 4: Cut and Weed the Vinyl
Cut each color separately using the recommended cutter settings for that material.
Weed away the unwanted vinyl while keeping each layer on its carrier sheet.
Keep the layers in pressing order so the application process remains organized.
Step 5: Test the Complete Design Before Pressing
Place all the weeded layers together on a flat surface.
Check:
- Color order
- Design alignment
- Missing elements
- Carrier overlap
- Layer compatibility
- Final size and placement
This simple check can prevent an entire garment from being wasted.
Step 6: Prepare the Garment
Place the garment flat on the heat press.
Make sure seams, collars, pockets, buttons and zippers do not interfere with the pressing area.
Pre-press the garment when recommended. A brief pre-press can help flatten the textile and remove excess moisture.
Step 7: Apply the First Layer
Position the bottom HTV layer using the garment's centerline or another fixed reference point.
Secure the carrier if necessary so the design cannot move when the heat press closes.
Apply a short tack press according to the HTV manufacturer's instructions.
Step 8: Peel the First Carrier Correctly
Peel the carrier according to the product's specified peel method.
Some HTV products require a hot peel, some a warm peel and others a cold peel.
Do not assume that every HTV uses the same peeling process.
Step 9: Position the Second Layer
Align the second HTV layer using your registration marks or reference points.
Check multiple edges and design features instead of relying on a single corner.
Make sure the carrier sheet does not cover areas where another HTV layer needs to bond directly to the garment.
Step 10: Tack the Second and Remaining Layers
Continue adding the remaining layers one at a time.
The general workflow is:
Layer 1 → Tack → Layer 2 → Tack → Layer 3 → Tack → Final Layer → Final Application
Keep intermediate presses as short as required by the individual material instructions to minimize unnecessary cumulative heat.
Step 11: Apply the Final Layer
The final layer is often where specialty effects are added.
This may include glitter, holographic, metallic, reflective, flock or another decorative HTV.
Complete the final application according to the manufacturer's specified temperature, pressure, time and peel method.
Can You Layer Glitter HTV?
Yes, glitter HTV can be used in layered designs, but it is generally better positioned as the top visible layer.
Traditional glitter HTV has a textured surface. That texture does not provide the same bonding conditions as smooth HTV or fabric.
Putting another HTV directly over glitter can therefore create an unreliable bonding surface unless the specific product has been designed and tested for that application.
If several glitter colors are required, consider using a knockout design. Each glitter section can then bond directly to the fabric rather than creating a thick stack.
Can You Layer Holographic HTV?
Holographic HTV is commonly used as a top-layer accent because of its specialty surface finish.
Before applying another HTV over a holographic layer, check the manufacturer's instructions. Surface finish, adhesive construction and thickness can all affect layering performance.
Can You Layer Puff HTV?
Puff HTV requires additional planning because the material expands during heating to create a raised appearance.
Repeated heating can affect the dimensional effect, while placing another layer over puffed material can create an uneven bonding surface.
For this reason, puff HTV is often better used as a final visual layer unless the specific product has been developed for a different layering process.
Can You Layer Flock HTV?
Flock HTV has a raised, fiber-like surface and therefore behaves differently from smooth PU HTV.
Some flock products may support layering while others are better used as top layers.
If flock is part of a multi-material design, test the exact combination before moving to bulk production.
Layering HTV on Stretch Fabrics
Stretch fabrics introduce another challenge: the garment moves.
A design that looks perfect immediately after pressing may behave differently when the fabric is stretched repeatedly.
For sportswear, activewear and other elastic textiles:
- Use stretch-compatible HTV.
- Avoid unnecessary thick stacking.
- Keep the design flexible where possible.
- Consider knockout construction for complex artwork.
- Test the finished decoration under actual stretching conditions.
When flexibility is important, fewer stacked layers generally produce a better hand feel than a thick multi-layer construction.
How Many Layers of HTV Can You Use?
There is no single maximum number of HTV layers that applies to every product.
The practical limit depends on:
- HTV thickness
- Adhesive construction
- Material compatibility
- Garment type
- Design size
- Heat exposure
- Required flexibility
Every additional layer increases thickness, heat exposure and registration difficulty.
For complex designs, it is often better to redesign the artwork using a knockout method rather than continuously adding more layers.
Stacked HTV vs. Knockout HTV
| Method | How It Works | Best For |
|---|---|---|
| Stacked HTV | One HTV layer is placed directly over another | Simple multi-color designs using compatible smooth HTV |
| Knockout HTV | Overlapping sections are removed so each color bonds to fabric | Complex designs, specialty HTV and thinner/flexible results |
Knockout construction can reduce overall vinyl thickness and cumulative heat exposure.
It is particularly useful when one of the materials has a textured or specialty surface that should not be covered by another HTV.
Common HTV Layering Problems and Solutions
Why Does HTV Shrink When Layering?
Repeated heating can cause some HTV films and textiles to contract slightly.
Solution: Use appropriate intermediate tack presses, avoid unnecessary full pressing cycles and test material shrinkage before producing highly detailed multi-color designs.
Why Is the Top Layer Peeling?
Possible causes include incompatible materials, incorrect temperature, insufficient pressure, incorrect peel timing or applying HTV over a textured surface that is not designed for layering.
Solution: Confirm compatibility and application settings. If the bottom material is unsuitable as a layering surface, use a knockout design.
Why Does the Bottom Layer Lift?
The bottom layer may not have been adequately tacked, or its peel instructions may not have been followed.
Solution: Check the specified tack time and peel method for that particular HTV.
Why Are My HTV Layers Misaligned?
Registration errors can come from inaccurate artwork, manual positioning, material shrinkage or repeated heating.
Solution: Use registration marks, fixed alignment boxes and garment centerlines. Minimize unnecessary heat before the final layer.
Why Does My Layered HTV Feel Too Thick?
Too much stacked vinyl creates unnecessary bulk.
Solution: Redesign the artwork using a knockout method where possible, especially for large logos or designs containing many colors.
Why Are There Carrier Marks on My HTV?
Carrier edges can leave marks when they overlap previously applied HTV during pressing.
Solution: Minimize unnecessary carrier overlap and use a suitable protective cover sheet or application method recommended for the material.
Heat Press vs. Household Iron for Layered HTV
A household iron may work for small personal projects, but a heat press provides much more consistent temperature, pressure and application time.
This becomes increasingly important as the number of HTV layers increases.
For commercial production, a heat press is strongly preferred because every garment needs to receive a repeatable process.
When producing hundreds of garments, consistency is more important than simply achieving one successful transfer.
Can You Mix Different HTV Brands?
Different HTV brands can sometimes be combined, but this should not be assumed to be safe or reliable without testing.
Different manufacturers may use different:
- Adhesive systems
- Film constructions
- Thicknesses
- Carrier sheets
- Temperature requirements
- Peel methods
If different brands are used in one design, test the complete combination on the actual garment before bulk production.
Professional HTV Layering for Commercial Production
For commercial apparel production, the best approach is to create an approved sample before manufacturing the complete order.
Record the actual production parameters, including:
- Garment material
- HTV type and color for each layer
- Application temperature
- Intermediate tack time
- Final pressing time
- Pressure
- Peel method
- Final appearance
- Wash-test result
This creates a repeatable production reference for operators.
It is especially useful for uniforms, sportswear, workwear, promotional apparel and branded merchandise where every piece needs consistent positioning and appearance.
How to Choose HTV for Layered Designs
The best HTV for layering is not necessarily the thinnest or most decorative material. It is the material that works reliably with the rest of the system.
Before choosing an HTV, consider:
- Fabric: cotton, polyester, blends, canvas or selected synthetic materials
- Surface: smooth or textured
- Stretch: whether the garment requires elasticity
- Thickness: how many layers will be used
- Finish: matte, glossy, glitter, metallic, reflective or dimensional
- Wash durability: intended frequency and washing conditions
- Production volume: single pieces or bulk orders
For multi-color designs, smooth PU or compatible stretch HTV is often a practical starting point, while specialty materials are commonly reserved for the final visible layer.
Washing and Caring for Layered HTV
Correct pressing is only part of long-term durability.
Follow the washing and care instructions supplied with the specific HTV and garment.
For commercial products, it is good practice to wash-test the complete design before approving a new material combination.
Test the actual finished decoration rather than testing each HTV separately. The interaction between multiple films and the fabric can produce different results from a single-layer application.
When Should You Use Layered HTV?
Layered HTV is particularly useful when a design needs different colors, textures or specialty effects.
Common applications include:
- Custom T-shirts
- Hoodies
- Sports jerseys
- Team uniforms
- Workwear
- Company logos
- Names and numbers
- Glitter apparel
- Reflective safety graphics
- Metallic logos
- Flock lettering
- Puff graphics
For highly detailed full-color artwork, DTF may be more efficient than building many separate HTV layers. For large-volume designs with a limited number of flat colors, screen printing may also be more economical.
HTV Layering Tips from a YanYan Heat Transfer Material Manufacturer
Layering should be treated as a complete material system rather than simply a design technique.
The adhesive, vinyl surface and textile all affect the final result.
A smooth PU HTV may work very well as a base layer, while a textured glitter surface may not provide the same bonding conditions. Likewise, a design that performs well on cotton may require different consideration when transferred to a stretch polyester garment.
For this reason, professional production should follow one simple principle:
Test the complete HTV-and-fabric combination, not just the individual material.
At YanYan, we focus on heat transfer materials for apparel decoration and OEM/ODM applications. Our product range covers different HTV constructions and specialty finishes for applications including T-shirts, sportswear, uniforms, bags and other textile products.
For production orders, we recommend confirming the material combination and application settings with a sample before moving into bulk production.
Frequently Asked Questions About Layering Heat Transfer Vinyl
Can you layer HTV on top of HTV?
Yes, provided the specific HTV products are compatible with layering. Smooth standard HTV is generally easier to layer than textured specialty HTV.
Which HTV layer goes first?
Start with the element that visually sits at the bottom of the design, provided that the material is suitable for use as a base layer.
Do you fully press every layer of HTV?
Usually not. Intermediate layers are commonly tacked briefly to reduce unnecessary cumulative heat. Follow the application instructions for the specific HTV.
Can you layer glitter HTV?
Glitter HTV can be included in layered designs, but it is generally better used as the final visible layer unless the product manufacturer specifically approves another layering arrangement.
Can you put regular HTV over glitter HTV?
It is generally not recommended unless the specific glitter HTV is designed for that application. A knockout design is often a better alternative.
Can you layer holographic HTV?
Yes, holographic HTV can be used in layered designs, but it is commonly positioned as a top layer. Check the product's technical instructions before covering it with another HTV.
Can you layer puff HTV?
Puff HTV requires careful planning because it expands during heating. It is commonly used as a final layer unless the manufacturer specifies otherwise.
Can you layer flock HTV?
Some flock HTV products can be layered, but their raised surface makes them different from smooth HTV. Always test the specific product combination.
How many layers of heat transfer vinyl can you use?
There is no universal maximum. More layers increase thickness, heat exposure and alignment difficulty. Complex designs may benefit from a knockout layout.
How do you keep layered HTV aligned?
Use registration marks, equal-size weeding boxes, garment centerlines or other fixed reference points. Pre-assemble the weeded layers before pressing to verify alignment.
Why is my layered HTV peeling?
Possible causes include incompatible materials, incorrect application settings, insufficient pressure, incorrect peel timing or placing HTV over a surface that is not suitable for layering.
Why does HTV shrink when layering?
Repeated exposure to heat can cause some HTV films and fabrics to shrink slightly. Short intermediate tack presses can help reduce unnecessary heat exposure.
Can different types of HTV be layered together?
Sometimes. Smooth PU, stretch, glitter, flock, metallic, reflective and puff HTV have different surface and application characteristics. Check the compatibility of the specific products before production.
Can I mix different HTV brands?
It is possible in some applications, but testing is recommended because different brands may use different adhesives, thicknesses, pressing conditions and peel methods.
Is layered HTV durable?
Properly selected and applied layered HTV can provide good durability. Material compatibility, application conditions, garment type and washing care all affect the final result.
Is knockout better than stacking HTV?
It depends on the design. Knockout construction can reduce thickness and allow each color to bond directly to the fabric, making it useful for complex designs and specialty HTV.
Can I use a heat press for layered HTV?
Yes. A heat press provides more consistent temperature, pressure and application time than a household iron, making it preferable for layered designs and commercial production.
Can layered HTV be used on polyester?
Yes, if the selected HTV is compatible with polyester. Always verify the specific HTV's fabric compatibility and application requirements before production.
Can layered HTV be used on cotton?
Yes. Cotton is one of the most common substrates for HTV, although the exact application settings depend on the HTV product.
Final Takeaway
Learning how to layer heat transfer vinyl is less about stacking as many colors as possible and more about controlling the entire application process.
Remember these four principles:
- Use compatible HTV materials.
- Build the design from the bottom upward.
- Keep intermediate presses as short as required.
- Use knockout artwork when direct stacking is not appropriate.
With the right material combination, accurate alignment and controlled heat exposure, layered HTV can produce clean, professional results for custom apparel and commercial textile decoration.
Before starting a large order, always test the complete HTV combination on the actual fabric and verify adhesion, appearance, flexibility and wash durability.
Looking for more HTV options? Visit our Heat Transfer Vinyl (HTV) collection to find PU, TPU, glitter, metallic, reflective, flock, puff and other heat transfer materials for custom apparel production.